👋 Introduction
🥱 I'm lazy and i just want to get started
You can jump in directly to the Quick Start Guide
🤔 What is Mantis ?
Mantis is an advanced open-source framework that:
- Enables automated asset discovery, reconnaissance, and vulnerability scanning processes
- The results of these comprehensive scans are stored in a robust MongoDB database
- and can be seamlessly integrated with any dashboard supporting MongoDB integration

🤨 Why another RECON automation framework ?
Mantis is a security framework engineered to provide exceptional value and convenience to both product security teams and bug bounty hunters alike.
- Our innovative framework offers unparalleled ease-of-use and customizable automation for all your recon needs
- With Mantis, you can take advantage of our advanced alerting capabilities and faster scanning times to fortify your defenses and stay ahead of the game
🚨 Disclaimer
Usage of this program for attacking targets without consent is illegal. It is the user's responsibility to obey all applicable laws. The developer assumes no liability and is not responsible for any misuse or damage caused by this program. Please use responsibly.
The material contained in this repository is licensed under apache2.
🎉 Features
With Mantis, you benefit from an array of exceptional features designed to enhance your workflows. These include but are not limited to:
- Recon Automation
- Super Easy Workflow Customisation
- Dashboard Support
- Integrate a new tool within minutes
- Distribute your scan and make it 2x Faster
- Understanding Scan Efficiency
- Integrate with your Org's DNS Service
- Advanced Alerting
- Secrets Scanning
Recon Automation
🤔 Use-Case
I want to:
- automate the entire process of asset discovery, reconnaissance, and vulnerability scanning
- store relevant details with contextual information in a database and retrieve them at any time
- schedule scans and set up alerts
😃 Feature
Mantis automates the entire process from discovery to scan and stores organization and application-based context in a MongoDB database.
The framework also provides easily customizable alerting capabilities with no code changes required.
Automation Overview
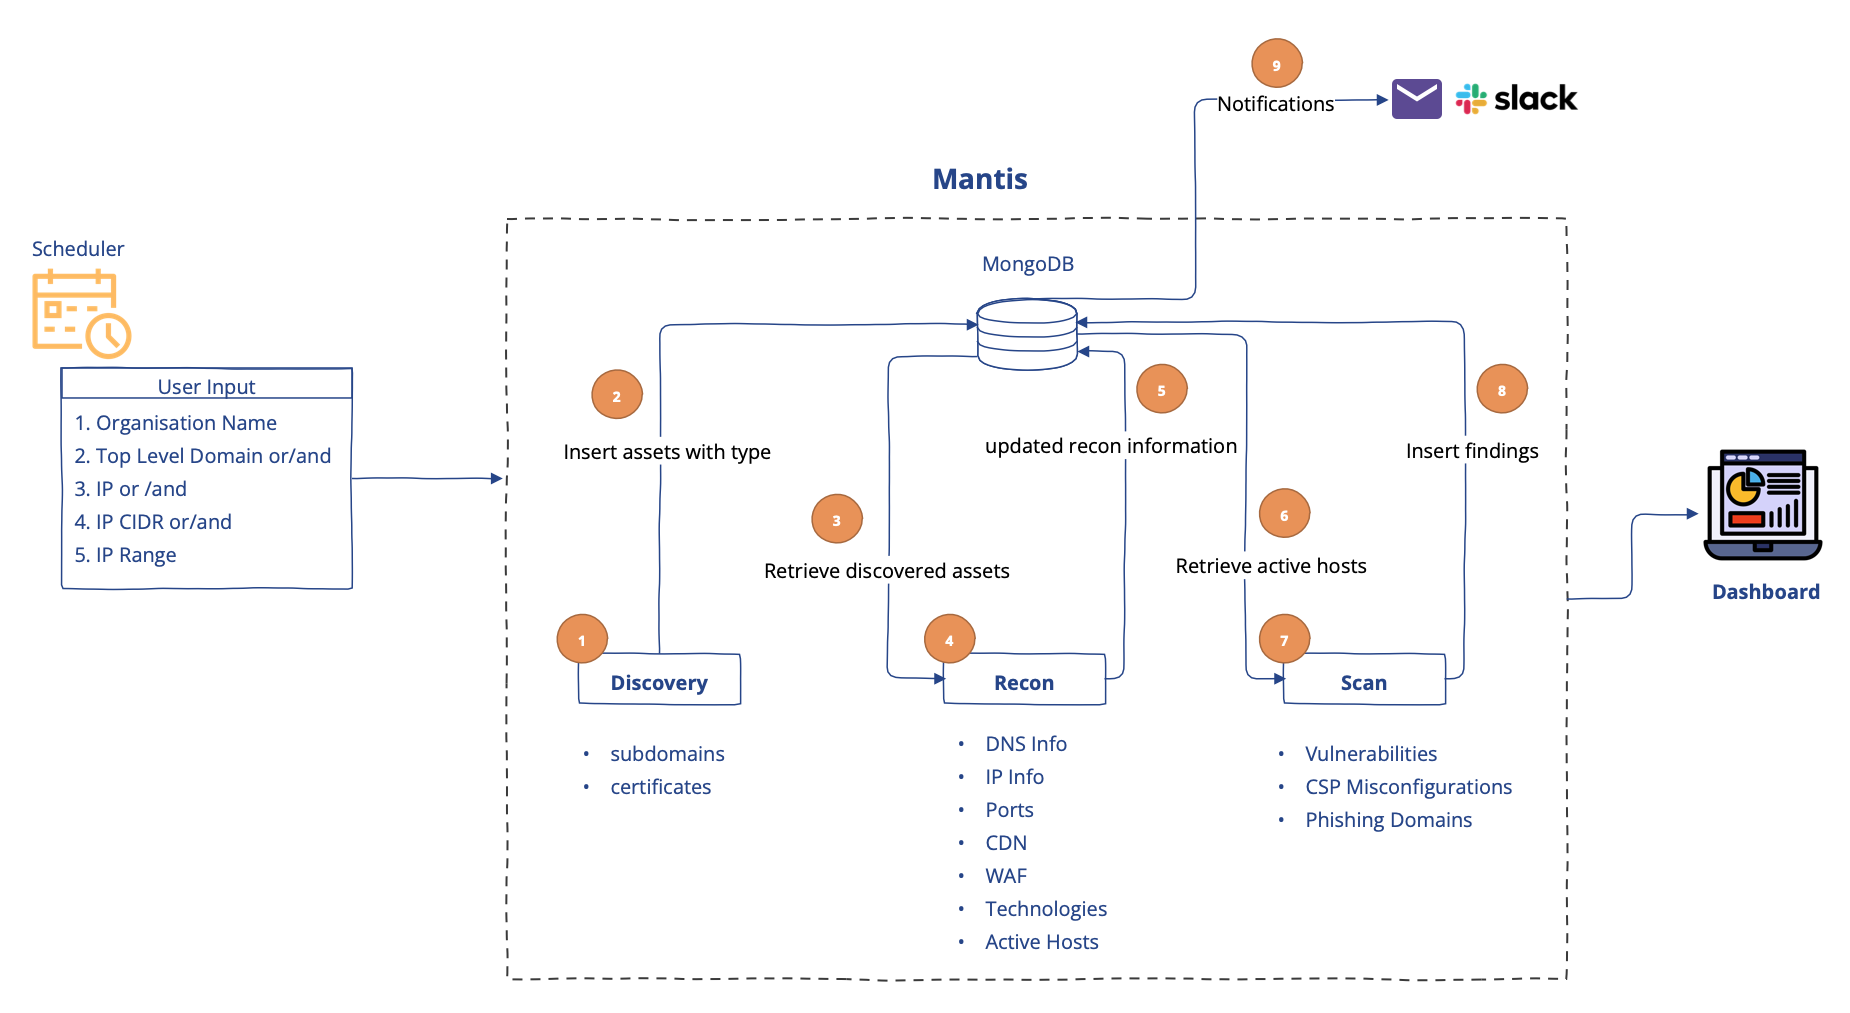
Mantis is capable of understanding top-level domain, IP, IP-CIDR, IP Range or even subdomains as user input
- Discovery module efficiently enumerates top-level domains provided as user input to identify subdomains
- Reconnaissance module fetches crucial and relevant information about assets required for vulnerability scanning
- Scan module is designed to identify misconfigurations and vulnerabilities
Distributed Scanning
🤔 Use-Case
I want to:
- scale my single scan across multiple machines. The number of assets owned by my organization is too large to scan on a single machine within a reasonable timeframe, making it either impossible or excessively time-consuming
😃 Feature
Mantis is one of the first recon automation framework that that allows you to distribute your single scan across multiple machines, including bare metals or instances in AWS or Azure..
How does Mantis distribute your scan ?
Mantis uses Ray framework to scale. Ray Core provides a small number of core primitives (i.e., tasks, actors, objects) for building and scaling distributed applications.
Please Note - A short infrastructure setup is required before utilising this feature as described here
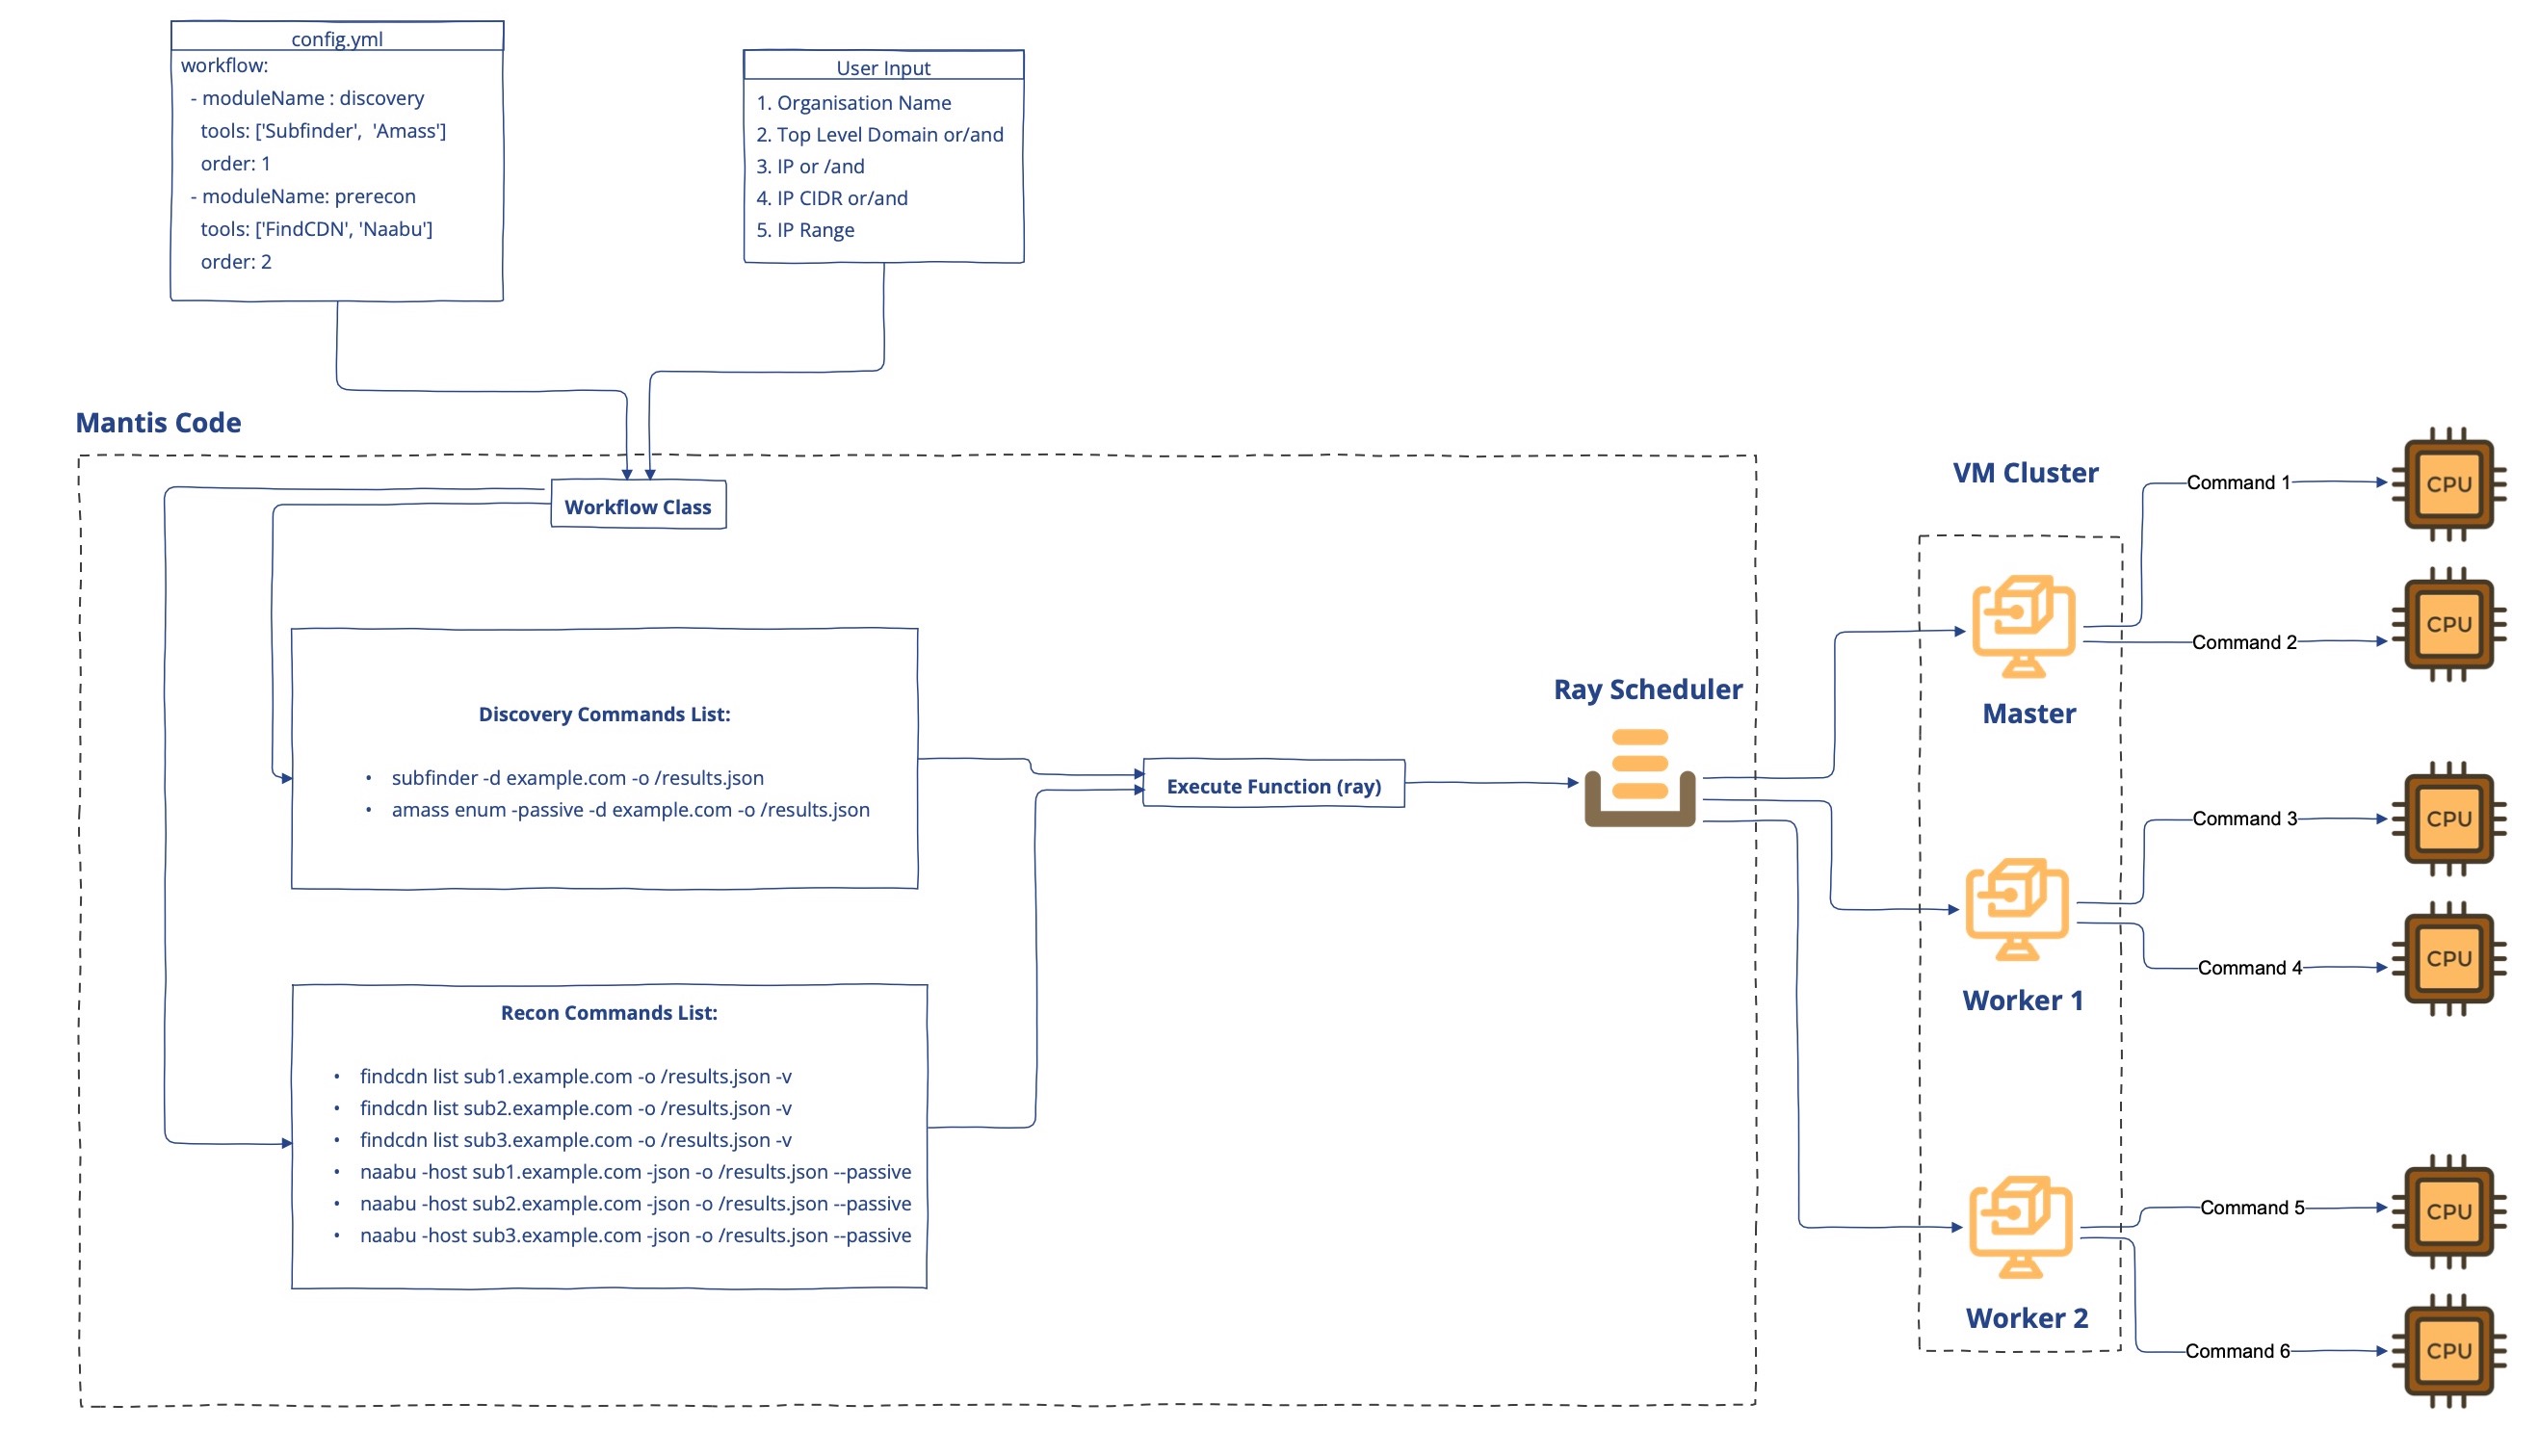
The Mantis framework is designed to use Ray Core in the most efficient way, breaking down a single scan into the most granular level. To put it simply:
- Each module has a specific assigned order number that indicates the sequence in which it should be executed. For example, Discovery needs to run before Recon, with Discovery's order number being 1 and Recon's being 2
- Scans required for each module are run in parallel while other modules wait for the previous module's completion
- The Workflow Class retrieves the module name and order from the config.yml file and generates commands for all the tools in each module for every asset. This list of commands is then passed to the Ray function
- The Ray function distributes these commands across VMs and allocates a single CPU for every command
- Ray's self-managed scheduling system ensures efficient allocation of resources, and configurable retries against potential failures provide added reliability
INFO💡: All of the internal implementation described above is for your information only. Once you have your infrastructure set up, all you need to do is add the IP addresses of your VMs to the configuration file, and everything else remains the same
Dashboard Support
🤔 Use-Case
I want to:
- create a dashboard that provides an overview of my organization, its assets, and its findings
😃 Feature
Mantis does not come with a dashboard as creating a user interface can be highly opinionated.
Instead, Mantis provides details of assets and findings in a structured format in MongoDB. Any dashboard that supports MongoDB integration should work with Mantis's output
Mantis's integration works well with the following dashboard:
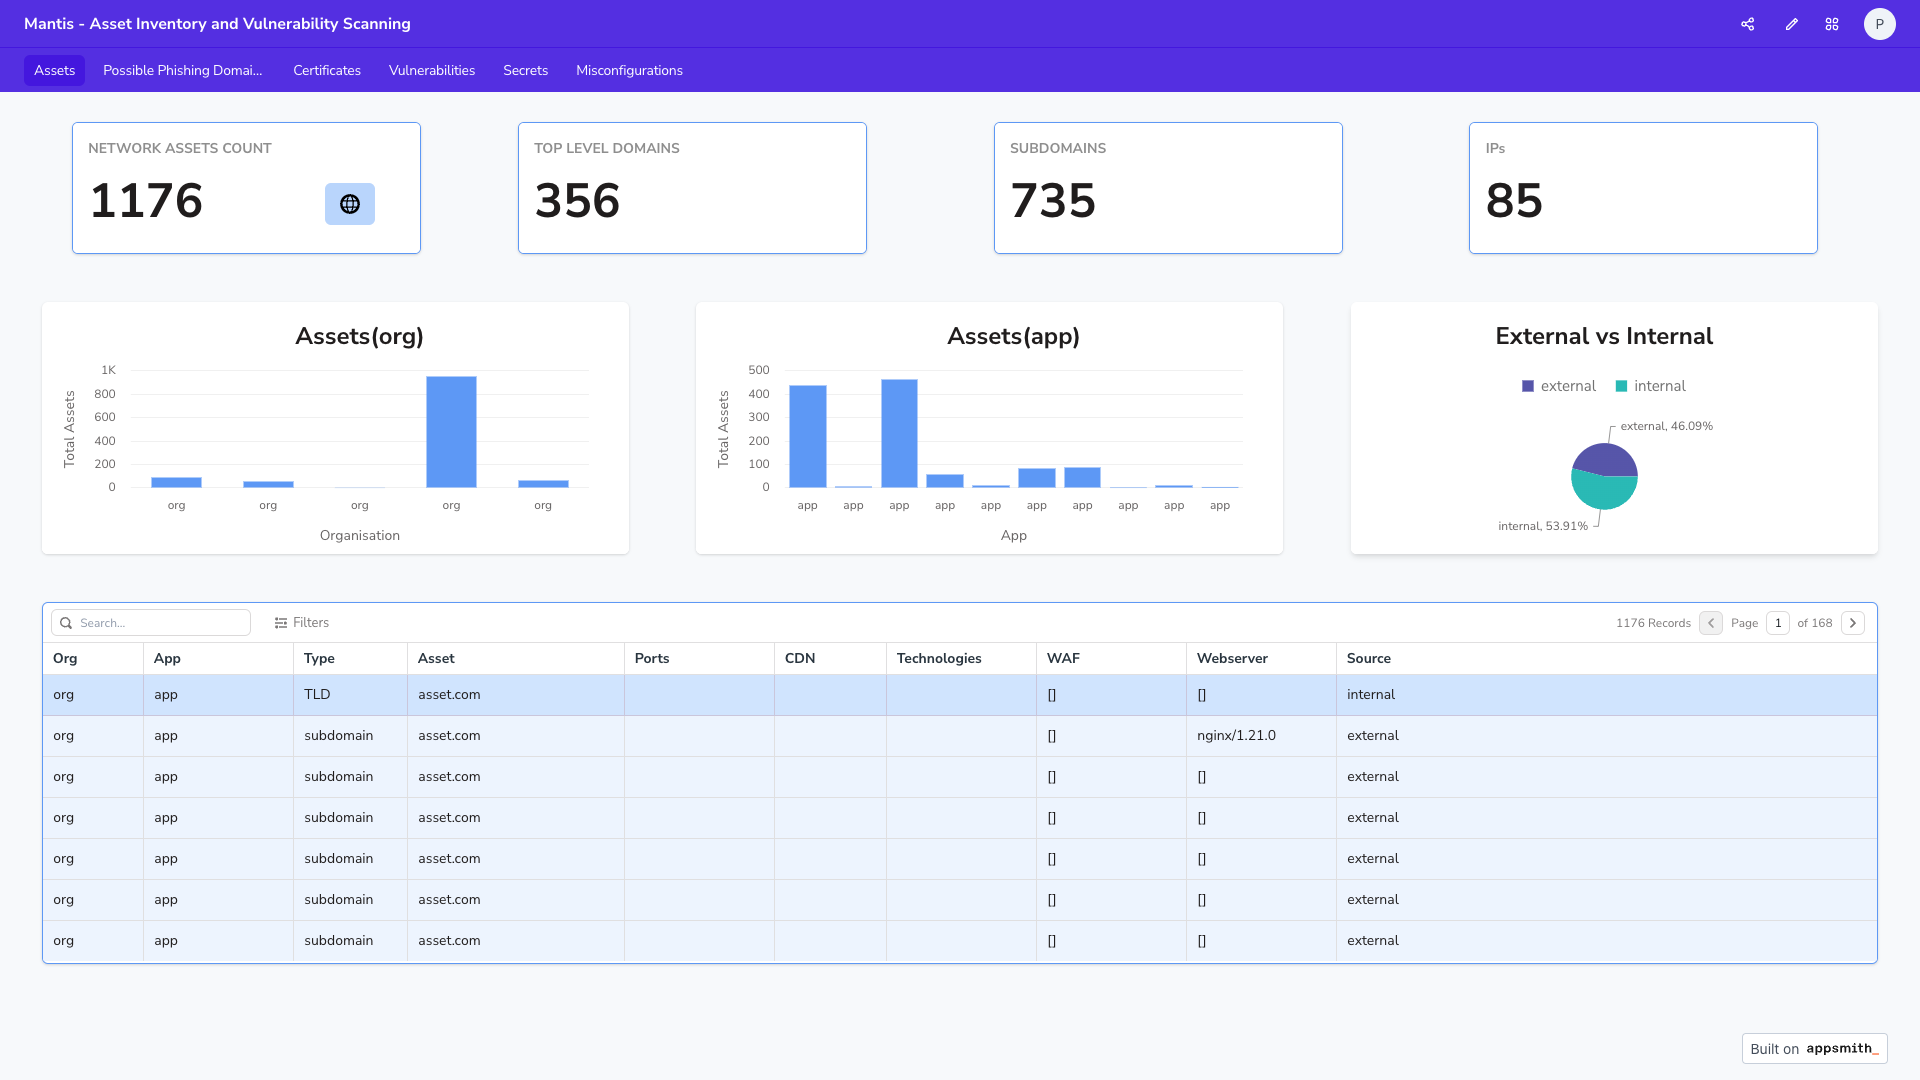
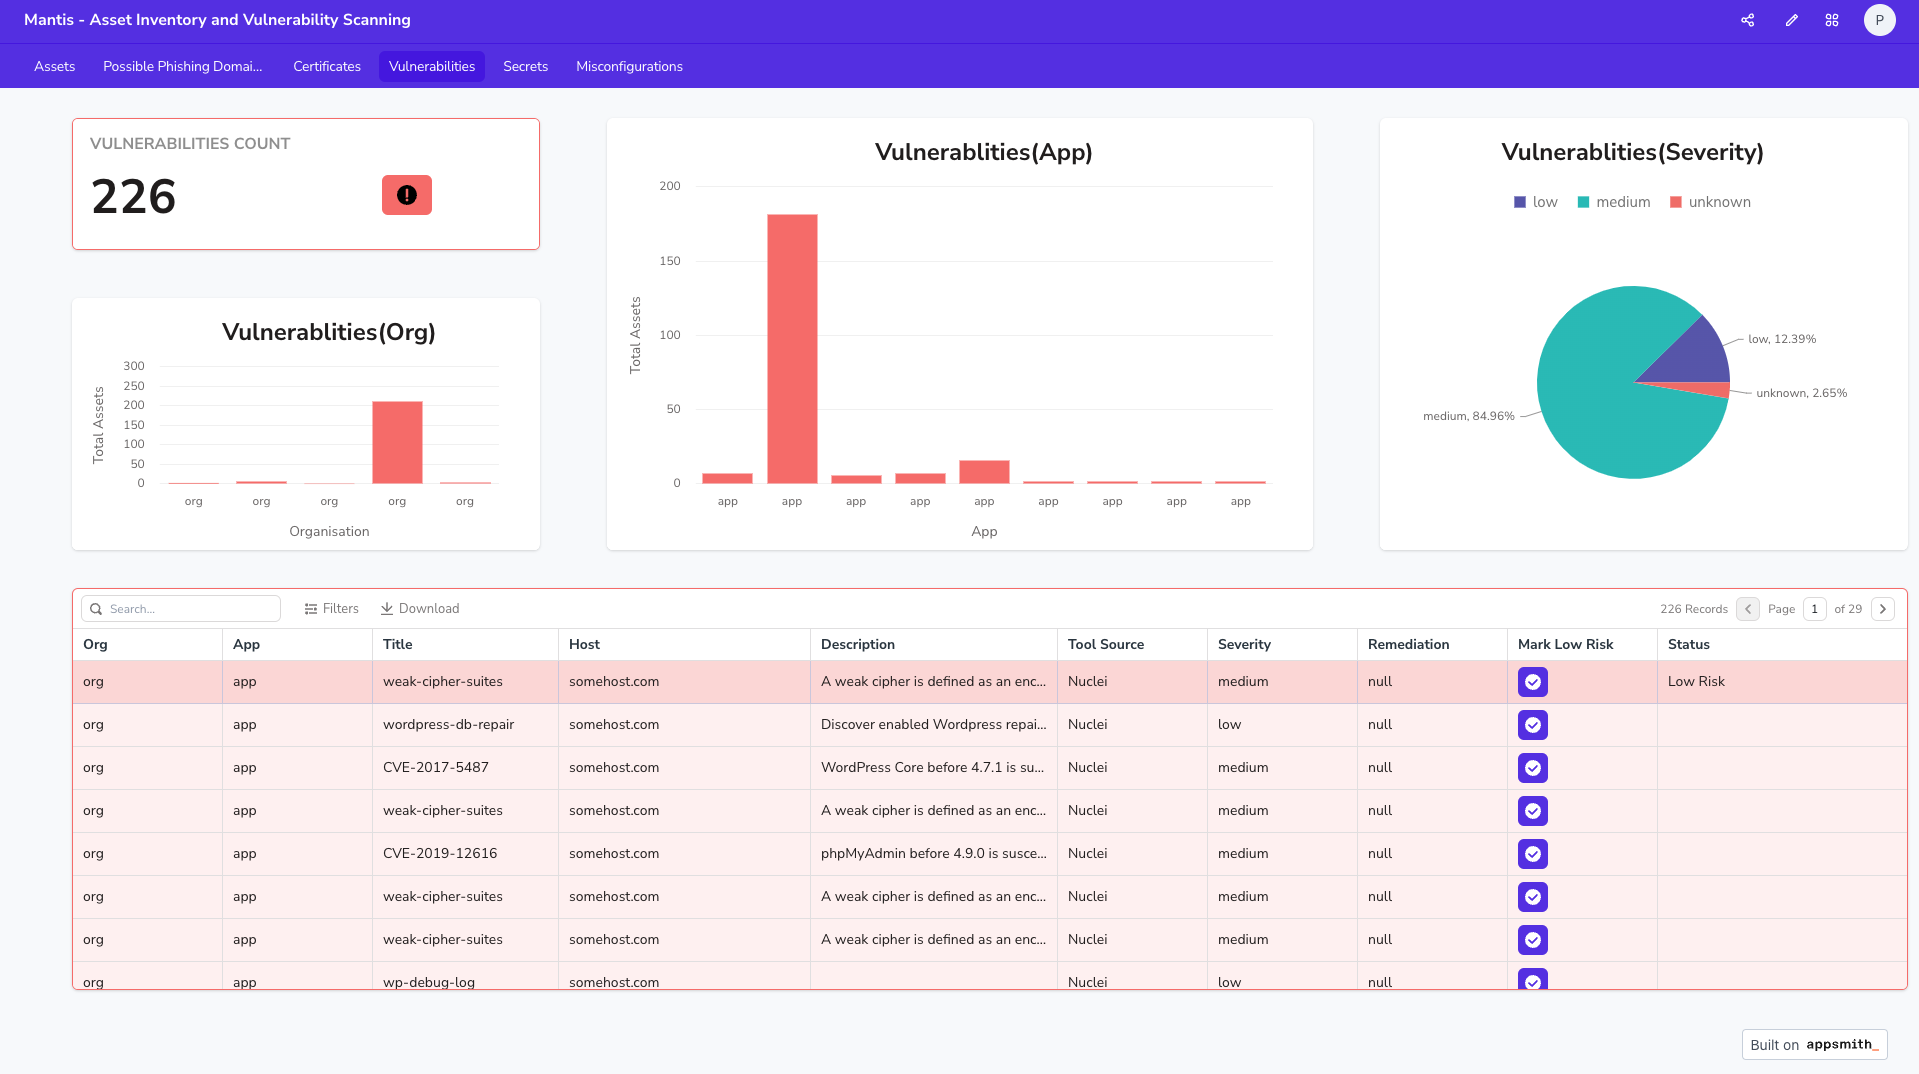
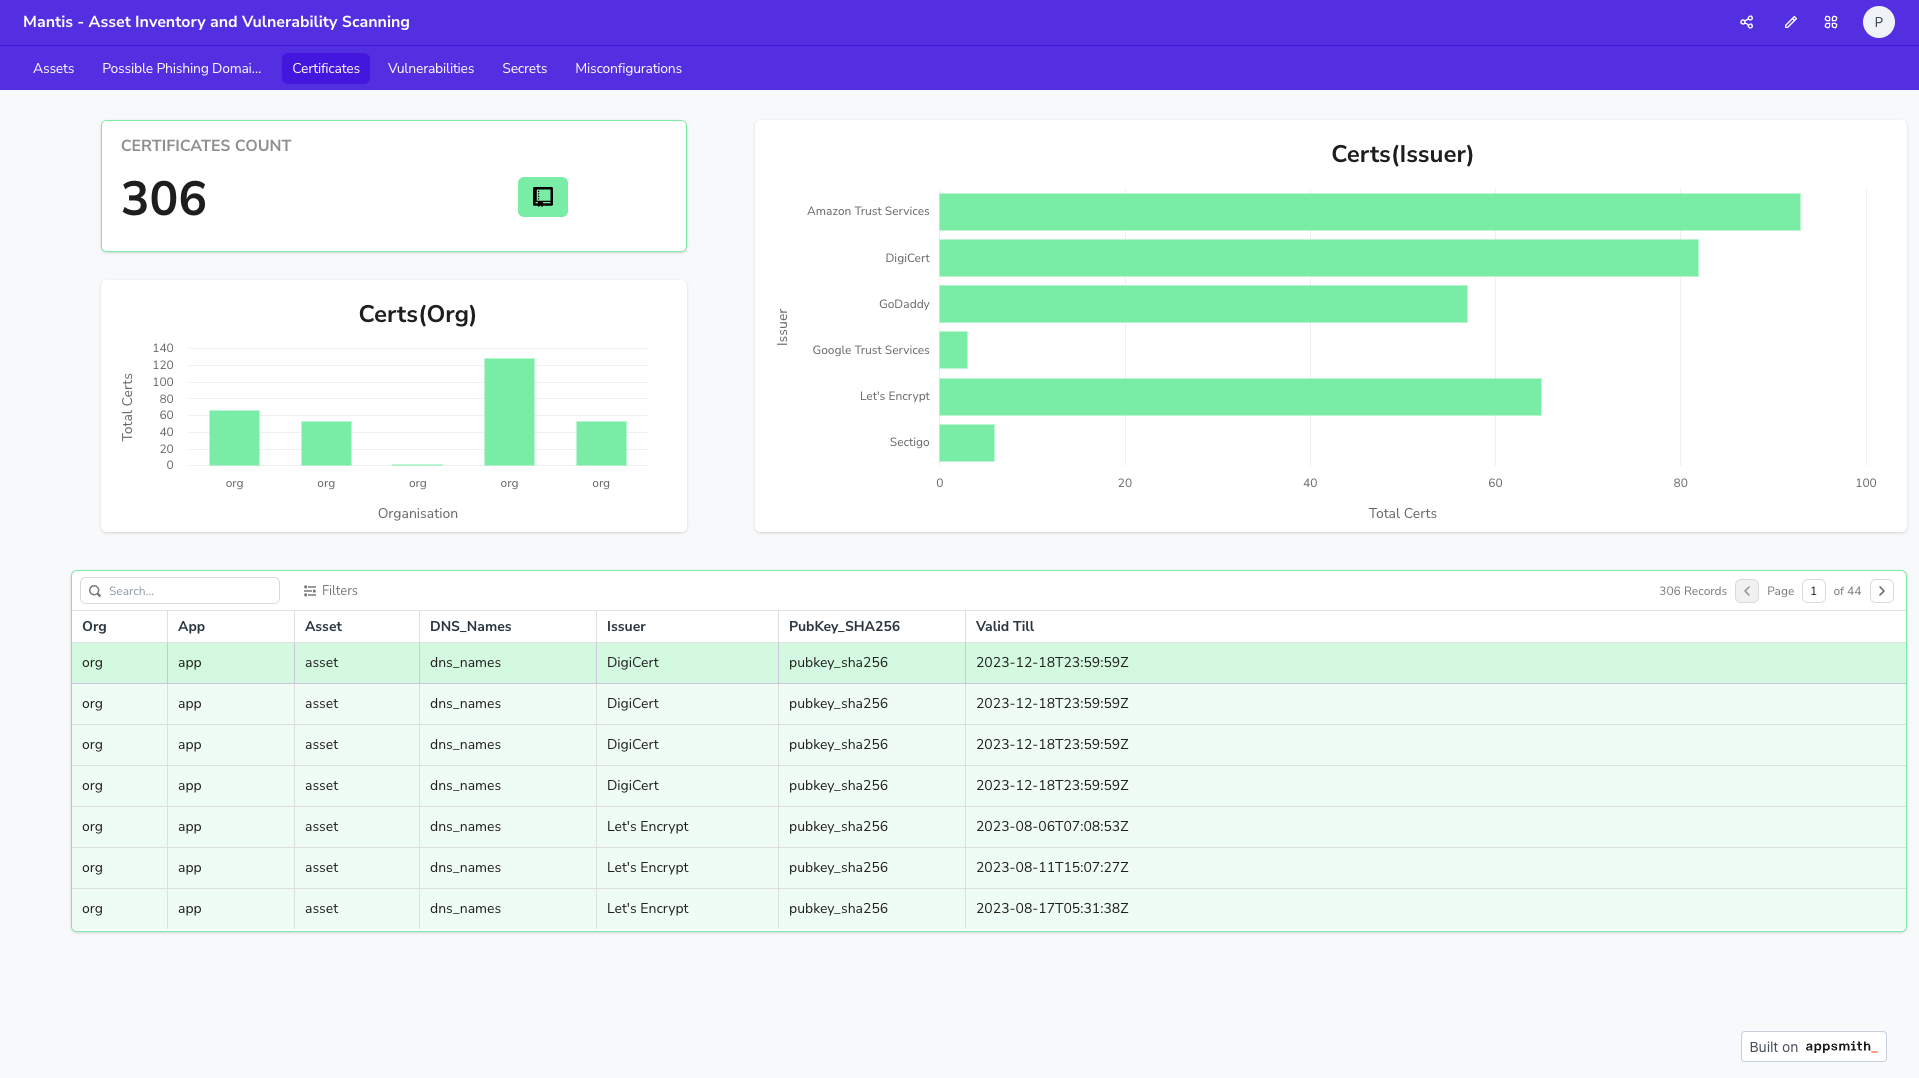
😮 How does Mantis look with AppSmith ?
Assets
Vulnerabilities
Certificates
Workflow Customisation
🤔 Use-Case
I want to:
- customize scans with ease to best suit my organization's or bug bounty requirements
- ability to choose from various modules, including discovery and vulnerability scanning, to create a tailored scan that meets my specific needs
- granular options to specify tools within each module, allowing me to optimize my security operations for maximum efficiency
😃 Feature
In Mantis:
- we refer to the entire automation process as a Workflow
- Worflow is further divided into individual blocks called as a Module
- Modules are further divided as Tools
All the above are easily customisable via a config file
🎛️ Workflow Customisation
This is the workflow snippet from config.yml, you can just add/remove the module or tool you want to customise:
workflow:
  - workflowName: 'default'
    schedule: 'daily between 00:00 and 04:00'
    cmd: ['python3 launch.py -o org_name -f org-tlds.txt --ignore_stale --stale']
    workflowConfig:
      - moduleName : Route53
        tools: ['Route53']
        order: 1
      - moduleName : discovery
        tools: ['Subfinder', 'SSLMate']
        order: 1
      - moduleName: prerecon
        tools: ['FindCDN', 'Naabu', 'IPinfo']
        order: 2
      - moduleName: activehostscan
        tools: ['HTTPX_Tech', 'HTTPX']
        order: 3
      - moduleName: activerecon
        tools: ['Wafw00f']
        order: 4
      - moduleName: scan
        tools: [ 'DNSTwister', 'Csper', 'Nuclei', 'NucleiRecon']
        order: 5
      - moduleName: secretscanner
        tools: ['SecretScanner']
        order: 6
- moduleName - Pre-packaged or custom modules
- tools - Tools included as part of the module
- order - The order in which the module needs to be executed, e.g., discovery needs to be run before recon
Examples
Example 1
Run a single module, say just 'Discovery', this is how your config is going to look, simply comment or remove the rest of the modules
workflow:
  - moduleName : discovery
    tools: ['Subfinder', 'SSLMate', 'Amass']
    order: 1
Example 2
Remove a tool, say you just want to run subdomain discovery and not identify 'certificates', so just remove 'SSLMate' from tools section under Discovery moduleName
workflow:
  - moduleName : discovery
    tools: ['Subfinder', 'Amass']
    order: 1
Understanding config.yml
INFO💡: For more details on config.yml and how to edit it, Click here
Advanced Alerting
🤔 Use-Case
I want to:
- customise my alerts, say, today i recieve alerts only for vulnerabilities, tomorrow i need to start receiving alerts for my phishing domains as well, there shouldnt be any code change
- tag specific teams for specific alerts
😃 Feature
Alerting is layered and config driven with no code change required in Mantis. There are two types of alerting that Mantis supports:
- Assets and Findings
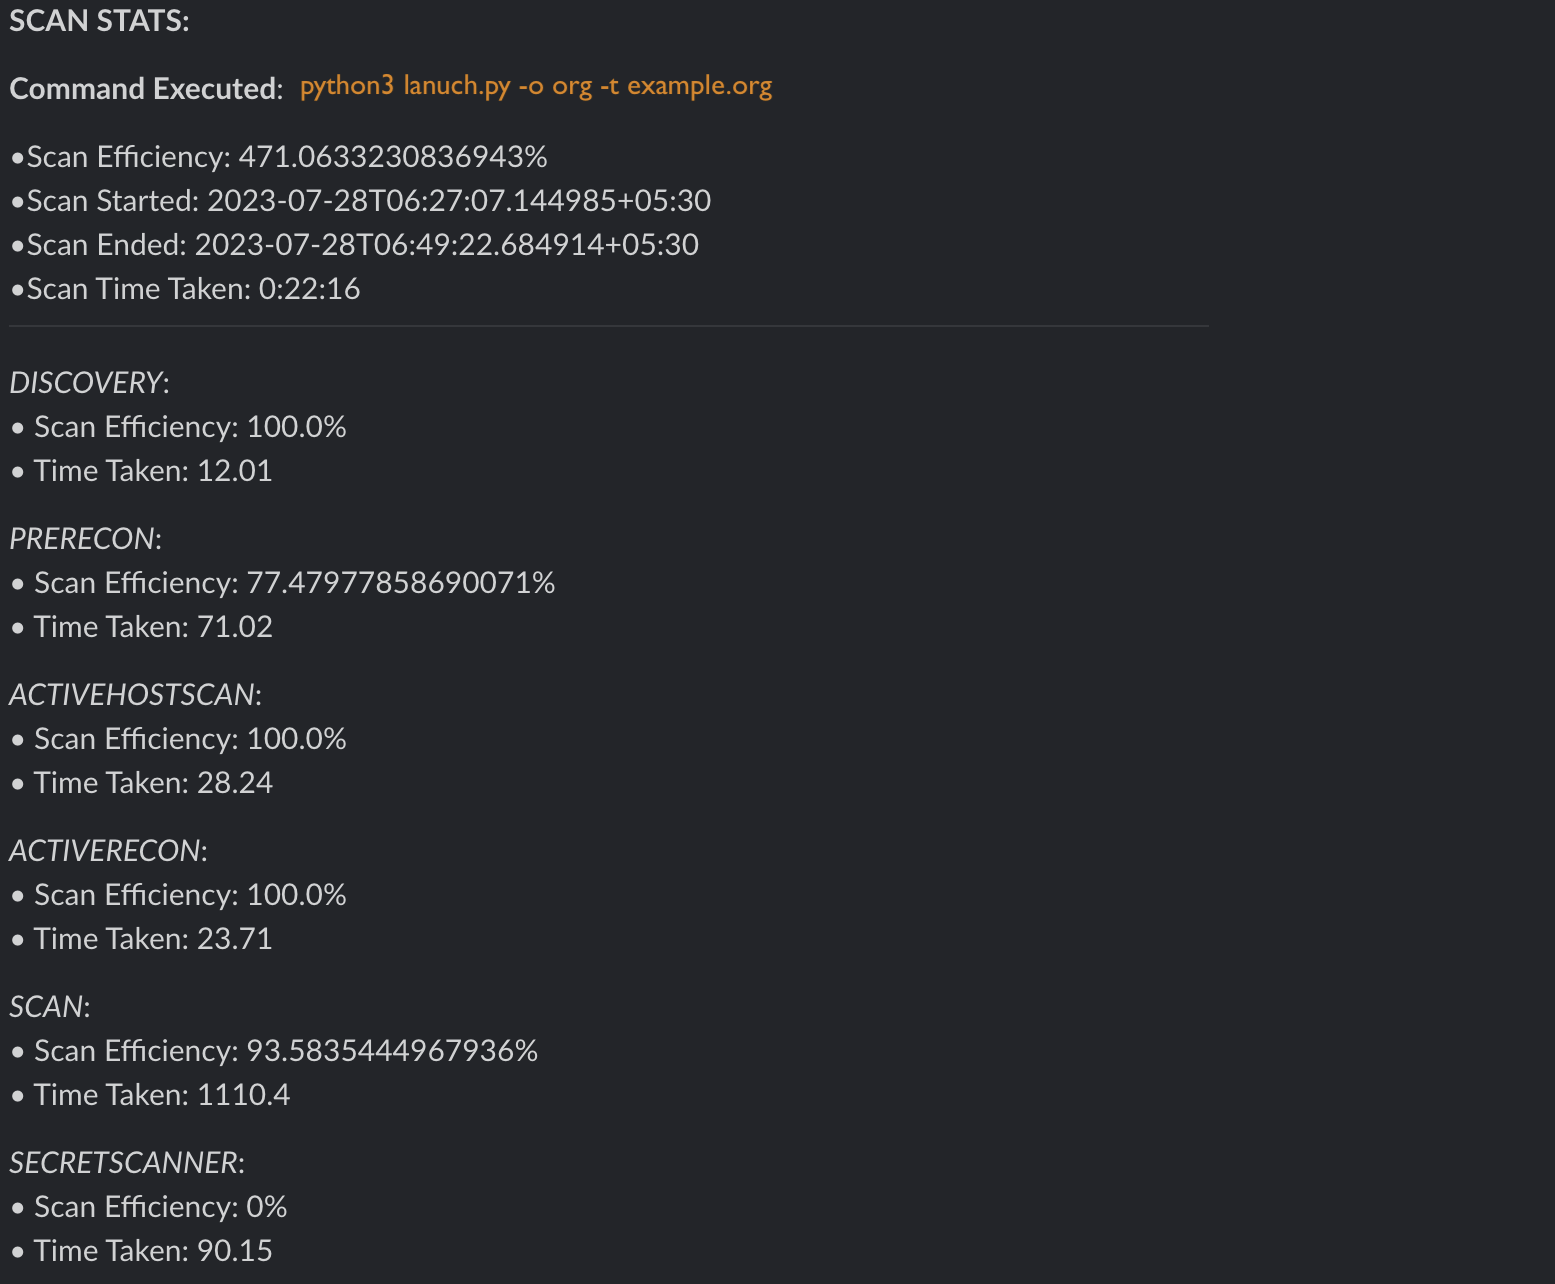
- Scan Stats
Currently, we support notifications via slack
Slack Alerts Example
Scan Efficiency Alert
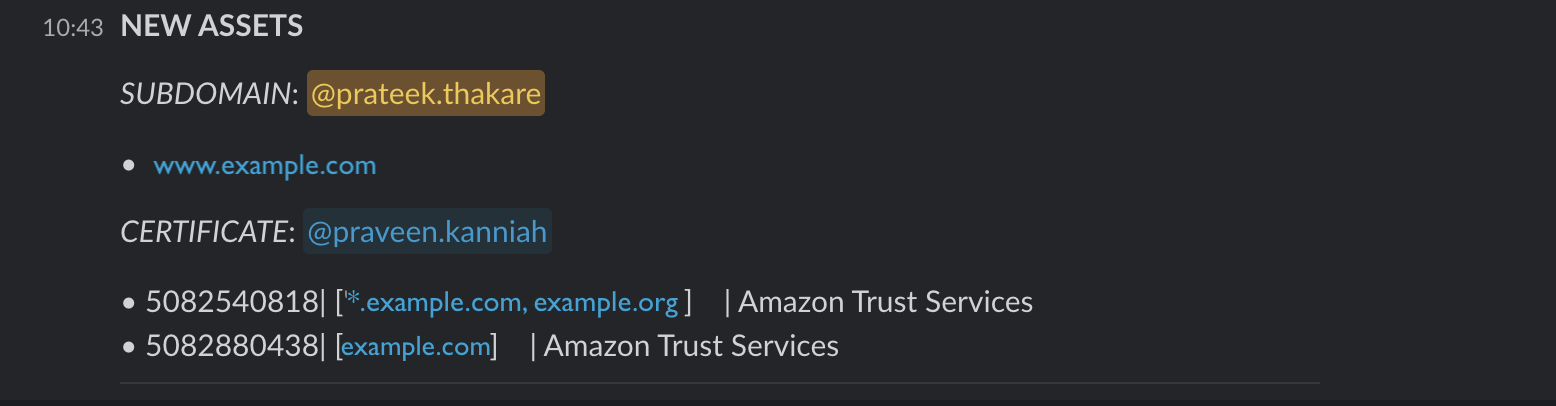
New Assets Alert
Understanding config.yml
INFO💡: For more details on config.yml and how to edit it, Click here
Understanding Scan Efficiency
🤔 Use-Case
I want to:
- understand whether my scans succeeded or failed
- determine the time taken for the scans
😃 Feature
Mantis provides you with efficient scan statistics at a granular level, including the following:
- Total scan time and efficiency
- Module level scan time and efficiency
- Success or Failure status for each asset
The Efficiency is calcuated based on the success/failure rates
Scan Efficiency
Post scan, Mantis outputs a file which is present in {mantis_dir}/logs/scan_efficiency/, which provides you with the scan metadata.
Success Scenario
{
    "module_name": "PRERECON",
    "module_start_time": "524109.441001708",
    "module_end_time": "524288.824489208",
    "module_time_taken": "0:02:59",
    "module_tool_logs": [
        {
            "tool_name": "FindCDN",
            "success": 1,
            "failure": 0,
            "code": 0,
            "command": "findcdn list example.in -o /tmp/7917f79d-8b06-4727-8953-dcf5c84efde6.json -v",
            "errors": null,
            "exception": null,
            "tool_time_taken": "0:02:59"
        }
    ]
}
The above stats clearly states:
- the python subprocess exit code was 0, indicating success (warning - this depends on how efficiently the tool handles exit codes as well)
- the scan for a particular asset example.com was successful
- the total time taken to run subfinder on that asset
Failure Scenario
{
    "module_name": "DISCOVERY",
    "module_start_time": "525058.566098541",
    "module_end_time": "525059.556518666",
    "module_time_taken": "0:00:01",
    "module_tool_logs": [
        {
            "tool_name": "Subfinder",
            "success": 0,
            "failure": 1,
            "code": 2,
            "command": "subfinder -te -d example.com -o /tmp/de4c5987-d4fe-46f9-89ef-f19af67cd1d0.txt",
            "errors": null,
            "exception": "[Errno 2] No such file or directory: '/tmp/de4c5987-d4fe-46f9-89ef-f19af67cd1d0.txt'",
            "tool_time_taken": "0:00:00"
        }
    ]
}
The above stats clearly states:
- the python subprocess exit code with a non-zero exit code (2), indicating failure
- the scan for a particular asset example.com was a failure, this is because a wrong subfinder command was passed
Integrate DNS Services
🤔 Use-Case
I want to:
- feed my known assets to the framework because I know that they belong to my organization
- have the capability to feed subdomains, IP, IP-CIDRs or IP Range
- integrate my organisation's DNS Service
😃 Feature
We are aware that no recon automation framework can be perfect in identifying all assets and findings. To some extent, this also depends on the tools used. Therefore, we designed Mantis to not only provide an external attacker's perspective but also add internal context to an organization.
There are two ways in which you can add internal context to Mantis:
- Integrate your DNS Service (Route 53)
- Upload a file (use the '-f' flag)
Secrets Scanning
🤔 Use-Case
I want to:
- identify any secrets belonging to my organization that have been leaked on the public internet
- identify any secrets that have been provided by my organization to our partners or vendors that have been leaked on the public internet
😃 Feature
INFO💡: Secrets scanning is currently an experimental feature due to a number of limitations, such as rate limiting that are applied on the search engines where we search for information.
The basic responsibility of secrets scanning is to identify secrets on the public internet. Currently, it searches for:
- Secrets in Wayback URLs
- Secrets in Wayback JS Files
- Secrets in Github for an Organistaion [Coming Soon]
- Secrets in Swagger [Coming Soon]
- Secrets in Postman Collections [Coming Soon]
Integrate new scanner in minutes
🤔 Use-Case
I want to:
- integrate new tools with a recon automation framework that the framework does not support by default
- add scanners that are either a command-line tool or an API
- integrate scanners quickly and easily
😃 Feature
Mantis is designed with the goal of minimizing the time it takes to integrate new scanners, whether for Mantis developers or external teams.
Mantis includes several functions that make integrating new scanners easy.
To add a new tool, this is what you need to do:
- Create a Python class for the scanner
- Extend ToolScanner if you are integrating a new command line scanner
- Extend APIScanner if you are integrating a new API scanner
- Implement three functions in the class
- get_commands() or get_api_calls(), depends on whether you choose Tool or API, this basically gets your scan command or API HTTP request ready
- parse_report() or parse_response(), again depends on whether you choose Tool or API, this is to parse the response
- db_operations(), insert the information to database and this is where its simple, we have built-in functions that takes care of everything
- Add the install instructions in DockerFile
INFO💡: For a more detailed understanding on how to integrate a new scanner, Click here
⚙️ Installation
Mantis provides multiple installation methods that includes performing the entire scan in a single system or multiple machines
Single Machine
- Docker
- Linux (Ubuntu) (Coming Soon)
- Windows (Coming Soon)
Multiple Machine
- Set of VMs (Coming Soon)
- AWS (Ansible script) (Coming Soon)
Docker
Mantis supports multiple installation types. Installing Mantis via Docker would be a good start to get a hang of the framework.
Considering that Mantis also includes mongoDB and AppSmith, we have provided a shell script that installs all the components.
Setup
Clone the Mantis repository
git clone https://github.com/PhonePe/mantis.git
cd into the Mantis directory
cd mantis/setup/docker
Run the respective docker setup file based on your OS
./docker-setup-macos.sh

./docker-setup-ubuntu.sh
🛠️ Mulitple VM Setup
Setup Overview
Mantis consists of three main components:
- Mantis Scan Framework
- MongoDB
- Dashboard (currently Appsmith; a proprietary dashboard is coming soon)
The single machine docker setup scripts will install all three components by default. Although this setup might suffice for testing Mantis or addressing basic needs, it can become slow as you onboard more organizations or when you need to scan your assets regularly. This is when distributed scanning becomes advantageous.
In a distributed scanning setup, the components should be set up separately to enhance performance.
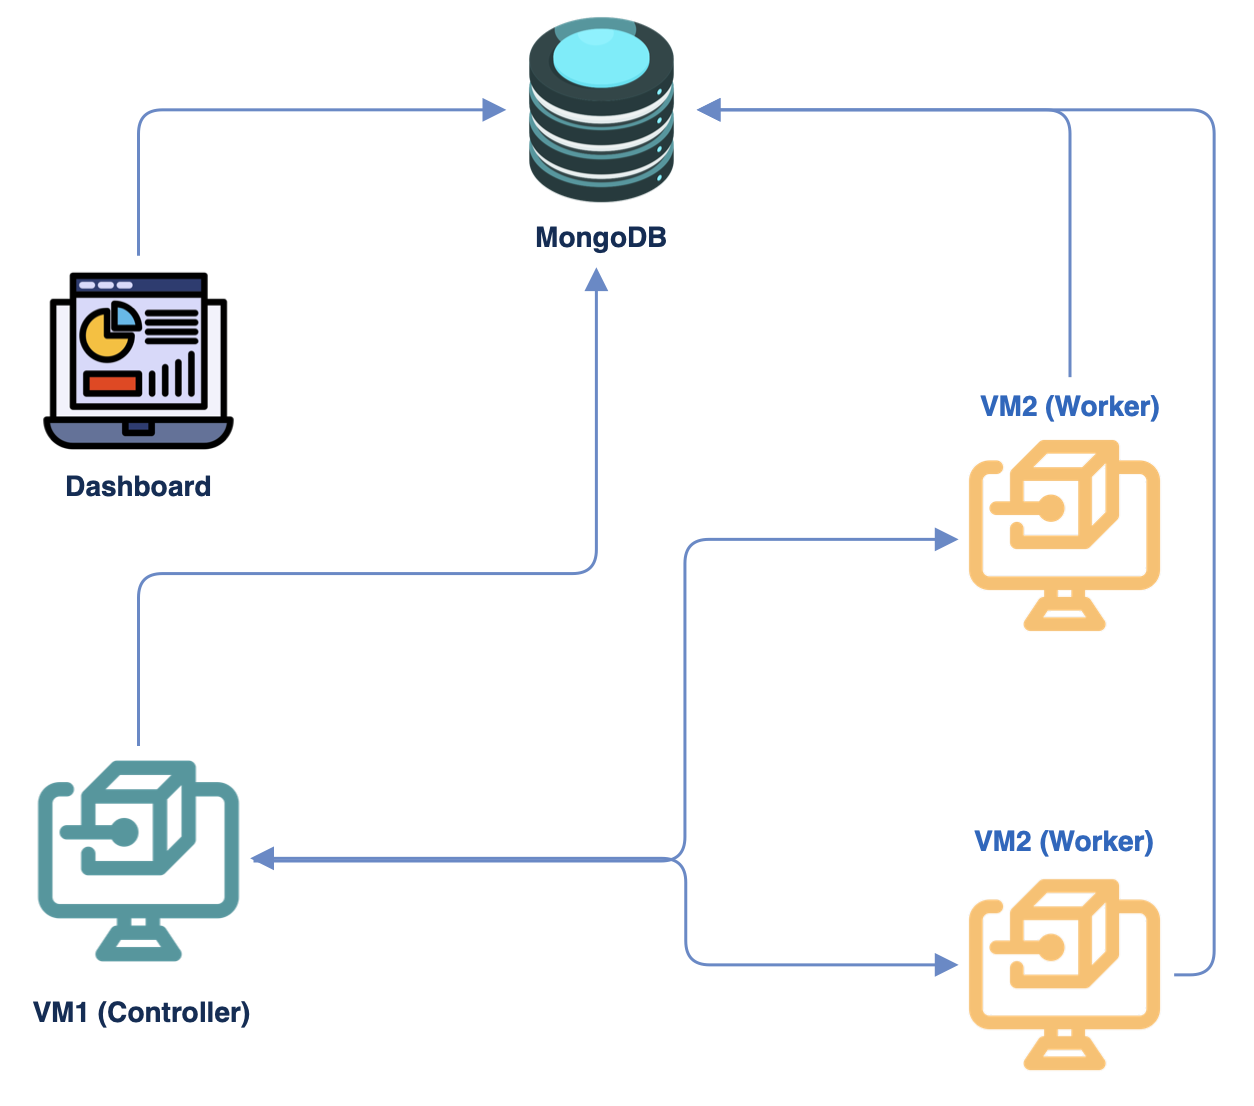
- The distributed scanning operates on the principle of the controller/worker model
- There is a main controller that distributes the tasks to the workers
- Both the controller and the workers communicate with a common database
- The dashboard is set up separately and connects with the database to pull information
Controller/Worker Hardware Requirements
For a single VM, this is a baseline requirement where we run scans on almost 1700 assets every day
- OS: Ubuntu
- Core: 4
- Memory: 16 GB (cores can vary if you dont want to scan your assets frequently)
⏭️ Let's now install the required components
Installation
As mentioned earlier, it is recommended to install the database and dashboard on a separate VM or setup, apart from the controller and worker VMs.
1. Mongo DB
You can set this up based on your convenience; here are multiple options:
- Setup MongoDB on cosmos Azure
- Setup MongoDB on a Linux VM
🚨 Warning - By default when you install mongoDB in linux, its bound to accept traffic only from localhost. Change this setting here to accept connections from external IPs too.
Once installed, copy the conenction string
2. Dashboard
- Setup Appsmith Dashboard
- Setup Proprietary Dashboard (coming soon)
3. Mantis
Please Note - The below steps have to repeated in controller and all the worker VMs. If you have 1 controller and 2 workers, install them in all the 3 VMs
Setup Mantis (Native Installation)
Pre-Requisites
- OS: 22.04.1-Ubuntu (x86_64)
A few tools require glibc 2.34 and hence this version is ideal.
Clone the repository
git clone https://github.com/PhonePe/mantis.git
Install Mantis dependencies
Within the repository, traverse to /setup/ path, change permissions and run the native setup file.
chmod +x native-setup.sh
./native-setup.sh
⏭️ Now that the required components are installed, let's make changes to the configuration.
Configuration
Add DB Connection string
In the controller VM, go to the path where you have cloned Mantis, and open local.yml within the /configs/.
Search for dbConfig in local.yml and add the connection string, then save it.
dbConfig:
  mongoConnectionString: 'PASTE CONNECTION STRING HERE'
⏭️ Let's now run a scan
Run the Scan
Ensure there is network connectivity between the controller and the workers, and that there are no blocks from the firewall
Initialise Ray
In the controller VM, run this command to start ray
ray start --head
You will also get the command to run on the workers once you execute the above command.
In all of the worker VMs, run this command to start ray and listen to the controller.
ray start --address='CONTROLLER_IP'
Run Scans
From the controller VM, you can simply start a scan using '-r', check the last command mentioned here
Please Note - Add python3.9 instead python3
python3.9 launch.py scan -o org_name -a app_name -r
You can view the ray dashboard here - http://127.0.0.1:8265/#/cluster, This will help us understand how the scans are being distributed across your controller and workers.
⏭️ The last step is to setup the dashboard
Setup Dashboard
AppSmith Dashboard Setup
Once you install the dashboard, you should be able access it from the https://DASHBOARD_IP:1337/
- Access this dashboard URL, you should be prompted to create an AppSmith account.
- Remember/bookmark this base url as AppSmith uses a multi-application construct with "My first application" as the default. We will be importing the appropriate Application and Pages in the following steps.
- Navigate to Applications with the "a_" icon on the upper left or using the link included.
- In the upper right of the Applications page, there is an orange button "Create new" as well as 3 dots, click the orange "Create new" button to expand a drop-down.
- The drop-down menu has 3 items: "Application", "Templates", and "Import" ... select "Import" by clicking it.
- From there, import the template JSON file. It is located in the cloned repo: in the dashboard_templates folder. (mantis\dashboard_templates\Mantis Dashboard.json)
-You will be asked to enter db information for the included MongoDB that was created. Enter the following:
- host: DATABASE_IP/DOMAIN
- port: 27017
- default db: mantis
Mantis Proprietary Dashboard Setup (coming soon)
🛠️ Configuration
Once you have setup Mantis, you can now look at customising your scan requirements. Scan customisations are available via:
- Config File - contains customisations related to scan workflow, scheduling, notifications etc.
- Command Line - contains basic options to onboard your assets and scan
INFO💡- Config File Path: /mantis/config/local.yml
📋 Config File
Mantis Config file provides multiple customisations including:
🎛️ Workflow Configuration
Warning 🚨 - In onboard mode, you should run scans only with the 'default' workflow
This is the workflow snippet from config.yml, you can just add/remove the module or tool you want to customise:
workflow:
  - workflowName: 'default'
    schedule: 'daily between 00:00 and 04:00'
    cmd: ['python3 launch.py -o org_name -f org-tlds.txt --ignore_stale --stale']
    workflowConfig:
      - moduleName : Route53
        tools: ['Route53']
        order: 1
      - moduleName : discovery
        tools: ['Subfinder', 'SSLMate']
        order: 1
      - moduleName: prerecon
        tools: ['FindCDN', 'Naabu', 'IPinfo']
        order: 2
      - moduleName: activehostscan
        tools: ['HTTPX_Tech', 'HTTPX']
        order: 3
      - moduleName: activerecon
        tools: ['Wafw00f']
        order: 4
      - moduleName: scan
        tools: [ 'DNSTwister', 'Csper', 'Nuclei', 'NucleiRecon']
        order: 5
      - moduleName: secretscanner
        tools: ['SecretScanner']
        order: 6
- moduleName - Pre-packaged or custom modules
- tools - Tools included as part of the module
- order - The order in which the module needs to be executed, e.g., discovery needs to be run before recon
Examples
Warning 🚨 - Do not modify the default workflow config, always create a new workflow before modifying it as shown in example 3
Example 1
Run a single module, say just 'Discovery', this is how your config is going to look, simply remove the rest of the modules
workflow:
  - moduleName : discovery
    tools: ['Subfinder', 'SSLMate', 'Amass']
    order: 1
Example 2
Remove a tool, say you just want to run subdomain discovery and not identify 'certificates', so just remove 'SSLMate' from tools section under Discovery moduleName
workflow:
  - moduleName : discovery
    tools: ['Subfinder', 'Amass']
    order: 1
Example 3
Now say you want to go one step ahead and create you own workflow, you can do that by simply copy, pasting the default workflow, make the corresponding changes and rename it according your requirement.
workflow:
  - workflowName: 'custom_workflow'
    schedule: 'daily between 00:00 and 04:00'
    cmd: ['python3 launch.py -o org_name -f org-tlds.txt --ignore_stale --stale']
    workflowConfig:
      - moduleName : discovery
        tools: ['Subfinder', 'Amass']
        order: 1
      - moduleName: prerecon
        tools: ['FindCDN', 'Naabu']
        order: 2
      - moduleName: activehostscan
        tools: ['HTTPX_Tech', 'HTTPX']
        order: 3
      - moduleName: scan
        tools: [ 'DNSTwister', 'Csper', 'Nuclei', 'NucleiRecon']
        order: 4
As you can see, the new workflow does not contain modules like Route53, ActiveRecon, SecretsScanning etc. A couple of tools like SSLMate and IPInfo have been removed too. The name of the workflow is also changed to custom_workflow
Now to run this new workflow, you can make use of the -w options
$ mantis -o example -t example.org -w custom_workflow
Scheduler Configuration
Mantis also lets you schedule scans, this scheduler option is present in in the workflow config itself.
Examples
Example 1
Setup default workflow module to be run everyday at 9AM.
INFO 💡 - Schedule key words are based on Python Rocketery Framework
workflow:
  - workflowName: 'default'
    schedule: 'daily between 09:00 and 11:00'
    cmd: ['python3 launch.py -o org_name -f org-tlds.txt --ignore_stale --stale']
    workflowConfig:
      - moduleName : Route53
        tools: ['Route53']
        order: 1
      - moduleName : discovery
        tools: ['Subfinder', 'SSLMate']
        order: 1
      - moduleName: prerecon
        tools: ['FindCDN', 'Naabu', 'IPinfo']
        order: 2
      - moduleName: activehostscan
        tools: ['HTTPX_Tech', 'HTTPX']
        order: 3
      - moduleName: activerecon
        tools: ['Wafw00f']
        order: 4
      - moduleName: scan
        tools: [ 'DNSTwister', 'Csper', 'Nuclei', 'NucleiRecon']
        order: 5
      - moduleName: secretscanner
        tools: ['SecretScanner']
        order: 6
- Created a new config discovery_workflow that only runs discovery module
- Set the schedule parameter to daily at 9:00
Example 2
Setup discovery module to be run everyday at 11AM.
workflow:
  - workflowName: 'discovery_workflow'
    schedule: 'daily between 11:00 and 14:00'
    cmd: ['python3 launch.py -o org_name -f org-tlds.txt -w discovery_workflow']
    workflowConfig:
      - moduleName : discovery
        tools: ['Subfinder', 'SSLMate']
        order: 1
- Created a new config discovery_workflow that only runs discovery module
- Set the schedule parameter to daily at 9:00
Setting App Context
Warning 🚨 - Considering this feature is a string based match, this will not be 100 % accurate when you add strings that are of shorter length
Mantis lets you setup an App Context to the subdomains discovered. For e.g. if you organisation has multiple apps like upi, insurance, mutual funds etc. You can provide key words for every app and Mantis will automatically map this context to each subdomain discovered and also to findings.
app:
  upi: [upi,payments]
  insurance: [insurance.org.com]
  mutual-funds: [mutual-funds, mutual]
This will map:
- upi.org.com, payments.org.com to upi app
- buy.insurance.org.com, integrations.insurance.org.com to insurance app
- mf.org.com, mf-buy.org.com, mf-api.org.com to mutual-funds app
Slack Notification
Mantis provides an advanced layered based Slack alerting, that includes:
- Teams
- Apps
- Assets/Findings
- Tagging
Notifications Config
notify:
  - teamName: web_team
    scanEfficiency: true
    channel:
      slack:
        - https://hooks.slack.com/services/********/********
    app: [payments-dashboard, transactions-dashboard]
    assets:
      - subdomain: ['prateek.thakare']
      - certificate: ['praveen.kanniah']
    findings:
      - vulnerability: []
      - secret: []
Layer 1 (Teams)
A Team is a team within an organistion, e.g. web team, appsec team, infra team etc. With Mantis, you can create unique configurations for every team and alert them for what they need.
Layer 2 (Apps)
In the background Mantis stores the identified assets, recon informtion and vulnerbailities in a mongDB database. Mantis lets you provide keywords to map a subdomain to an App, like this:
app:
payments-dashboard: [payments, upi]
transactions-dashboard: [transactions, npci]
If a subdomain is discovered with these keywords, it will automatically map it to an app and store the context. A team can now receive alerts specific to an app.
Layer 3 (Assets and Findings)
A team can also receive alerts based on an Asset Type or Findings Type
- Assets
- TLD (Top Level Domain)
- Subdomain
- IP
- Certificates
- Findings
- Vulerabilities
- Misconfigurations
- Phishing
- Secrets
You can add/delete the types you want to receive/ignore alerts for.
Layer 4 (Tagging and Channels)
This layer is specific to Slack alerting, where in a group you can particularly tag a specific person for a particular alert.
🖥️ Command Line
Mantis ships with a simple list of command line options.
Quick Help
  usage:
        ONBOARD: (First time scan, Run this !!)

        mantis onboard -o example_org -t www.example.org
        mantis onboard -o example_org -f file.txt

        SCAN:

        mantis scan -o example_org
        mantis scan -o example_org -a example_app


options:
  -h, --help      list command line options

subparser:
  {onboard,scan}
    onboard       Onboard a target
    scan          Scan an org
Onboard Help
usage:
        ONBOARD: (First time scan, Run this !!)

        mantis onboard -o example_org -t example.tld
        mantis onboard -o example_org -f file.txt


options:
  -h, --help            show this help message and exit
  -t HOST, --host HOST  top level domain to scan
  -f FILE_NAME, --file_input FILE_NAME
                        path to file containing any combination of TLD, subdomain, IP-range, IP-CIDR
  -w WORKFLOW, --workflow WORKFLOW
                        workflow to be executed as specified in config file
  -o ORG, --org ORG     name of the organisation
  -a APP, --app APP     scan only subdomains that belong to an app
  -p, --passive         run passive port scan
  -s, --stale           mark domains as stale (domains purchased but not in use)
  -i, --ignore_stale    ignore stale domains during scan
  -tc THREAD_COUNT, --thread_count THREAD_COUNT
                        thread count, default 10
  -r, --use_ray         use ray framework for distributed scans
  -n NUM_ACTORS, --num_actors NUM_ACTORS
                        number of ray actors, default 10
  -d, --delete_logs     delete logs of previous scans
  -v, --verbose         print debug logs
  -aws AWS_PROFILES, --aws_profiles AWS_PROFILES
                        List of comma separated aws profiles for Route53
Scan Help
usage:
        SCAN:

        mantis scan -o example_org
        mantis scan -o example_org -a example_app


options:
  -h, --help            show this help message and exit
  -w WORKFLOW, --workflow WORKFLOW
                        workflow to be executed as specified in config file
  -o ORG, --org ORG     name of the organisation
  -a APP, --app APP     scan only subdomains that belong to an app
  -p, --passive         run passive port scan
  -s, --stale           mark domains as stale (domains purchased but not in use)
  -i, --ignore_stale    ignore stale domains during scan
  -tc THREAD_COUNT, --thread_count THREAD_COUNT
                        thread count, default 10
  -r, --use_ray         use ray framework for distributed scans
  -n NUM_ACTORS, --num_actors NUM_ACTORS
                        number of ray actors, default 10
  -d, --delete_logs     delete logs of previous scans
  -v, --verbose         print debug logs
  -aws AWS_PROFILES, --aws_profiles AWS_PROFILES
                        List of comma separated aws profiles for Route53
📨 Run a Scan
Mantis provides two modes to scan:
- Onbaord and Scan
- Scan
Onboard and Scan
You want to onboard an org with its TLDs/IPs/IP-CIDRs/IP Range for the first time, use the onboard mode. This runs the scan on the default workflow.
You can use mantis command or directly run the framework using python3 launch.py.
TLD
python3 launch.py onboard -o org_name -t example.in
IP
python3 launch.py onboard -o org_name -t 10.123.123.12
IP-Range
python3 launch.py onboard -o org_name -t 10.0.0.10-10
IP-CIDR
python3 launch.py onboard -o org_name -t 10.0.0.10/24
Onboard Known Assets and Scan
python3 launch.py onboard -o org_name -f input.txt
Scan on all assets belonging to an organisation
Now that you have onboarded, you just need to run scheduled scans for an org, you can just use the scan mode
python3 launch.py scan -o org_name
Scan on all assets belonging to an organisation and app
python3 launch.py scan -o org_name -a app_name
Scan using RAY (Distributed Scanning)
python3 launch.py scan -o org_name -a app_name -r
📨 Notifications
Mantis currently supports the following clients for Notifications:
- Slack
- Discord [Coming Soon]
- Mail [Coming Soon]
Slack
Mantis provides an advanced layered based Slack alerting, that includes:
- Teams
- Apps
- Assets/Findings
- Tagging
Notifications Config
notify:
  - teamName: web_team
    scanEfficiency: true
    channel:
      slack:
        - https://hooks.slack.com/services/********/********
    app: [payments-dashboard, transactions-dashboard]
    assets:
      - subdomain: ['prateek.thakare']
      - certificate: ['praveen.kanniah']
    findings:
      - vulnerability: []
      - secret: []
Layer 1 (Teams)
A Team is a team within an organistion, e.g. web team, appsec team, infra team etc. With Mantis, you can create unique configurations for every team and alert them for what they need.
Layer 2 (Apps)
In the background Mantis stores the identified assets, recon informtion and vulnerbailities in a mongDB database. Mantis lets you provide keywords to map a subdomain to an App, like this:
app:
payments-dashboard: [payments, upi]
transactions-dashboard: [transactions, npci]
If a subdomain is discovered with these keywords, it will automatically map it to an app and store the context. A team can now receive alerts specific to an app.
Layer 3 (Assets and Findings)
A team can also receive alerts based on an Asset Type or Findings Type
- Assets
- TLD (Top Level Domain)
- Subdomain
- IP
- Certificates
- Findings
- Vulerabilities
- Misconfigurations
- Phishing
- Secrets
You can add/delete the types you want to receive/ignore alerts for.
Layer 4 (Tagging and Channels)
This layer is specific to Slack alerting, where in a group you can particularly tag a specific person for a particular alert.
Tools List
List of tools that Mantis framework integrates and their purpose
| Module | Tool | Purpose |
|---|---|---|
| Discovery | Subfinder | Subdomain Enumeration |
| Discovery | AMASS | Subdomain Enumeration |
| Discovery | SSLMate | Certificates |
| Pre-Recon | FindCDN | Determine CDN |
| Pre-Recon | Naabu | Port Discovery |
| Pre-Recon | IPInfo | Extract IP Information |
| Active-Host-Scan | HTTPX | Determine Active hosts & Technologies |
| Active-Recon | Wafw00f | Deteminf WAF |
| Scan | Nuclei | Vulnerability Scan |
| Scan | DNS Twister | Determine Phishing domains |
| Scan | Csper | Identify CSP misconfigurations |
| Scan | Corsy | Identify CORS misconfigurations |
| Secrets | GAU | Determine wayback URLs |
| Secrets | Gitleaks | Identify Secrets |
📖 Mantis Code - Getting Started
Before you add a new module or scanner to Mantis yourself, it is important to understand the parts of the code that you'll be editing and certain functions that will come in handy.
In this walkthrough, we shall mainly focus on:
- Mantis folder structure - This will help you understand exactly where you need to make changes for new integrations
- Base scanner class - Based on the scanner that you want to integrate, this will help you choose the base class that you need to inherit
- Important utility functions - If your new scanner only accepts IP addresses, TLDs, or sometimes both, you don't have to write any queries or functions to validate the inputs. Mantis has built-in utility functions that can provide you with this input directly.
- DB models - After your new scanner completes its scan, you'll need to insert the results into MongoDB. To do so, you'll need to understand the schema that is in place. This will help you do that.
A basic understanding of the above will simplify any new integrations with Mantis.
⏭️ Let's begin with understanding the folder structure next.
Code - Folder Structure
This is an overview of the Mantis code's folder structure.
.
├── configs
├── mantis
│   ├── config_parsers
│   ├── db
│   ├── models
│   ├── modules
│   │   ├── Route53
│   │   ├── activehostscan
│   │   ├── activerecon
│   │   ├── discovery
│   │   ├── prerecon
│   │   ├── scan
│   │   └── secretscanner
│   │       └── submodules
│   ├── scan_orchestration
│   ├── tool_base_classes
│   ├── utils
│   └── workflows
└── setup
    ├── docker
    └── ubuntu
INFO💡: Before we begin, remember, the entire automation process is referred to as a workflow in Mantis, which is further broken down into modules, and modules are further broken down into tools.
For the purpose of new integrations, let's look at the folders that will be most relevant to our objective.
- configs - This folder contains the file local.yml, which is where, you do most of your framework customisations
- db - Not every file under db will interest you, except the db_models.py. This file contains the db schema
- modules - This folder contains the scanner classes categorized by each module. Here's a quick look inside one of the modules folder discovery
. ├── Amass.py ├── SSLMate.py ├── Subfinder.py └── __init__.py - utils - Again not every file is of importance, except the tool_utils.py. This file contains functions that will make your life simple during new integrations
- DockerFile - Last, the DockerFile itself, where you will add the installation instructions for new scanners, if any
A Quick Correlation to local.yml
This is a snippet of the workflow section in local.yml
workflow:
  - moduleName : discovery
    tools: ['Subfinder', 'SSLMate', 'Amass']
    order: 1
  - moduleName: prerecon
    tools: ['FindCDN', 'Naabu', 'IPinfo']
    order: 2
  - moduleName: activehostscan
    tools: ['HTTPX_Tech', 'HTTPX']
    order: 3
  - moduleName: activerecon
    tools: ['Wafw00f']
    order: 4
  - moduleName: scan
    tools: [ 'DNSTwister', 'Csper', 'SecretScanner']
    order: 4
Let's do a quick correlation.

- moduleName, i.e. discovery, prerecon, activehostscan etc. are sub-folders under modules folder
- tools under each moduleName, e.g. under discovery, you can find Subfinder, SSLMate, Amass, are the name of the scanner classes defined under each module
⏭️ Now that you have a basic understanding of the folder structure, lets now understand the different types of scanner base class that Mantis offers.
Scanner Base Class
When you are integrating a new scanner, the first thing to you need to know is that, if your scanner is a command line tool or an API, based on this there are two types of Scaner classes available.
- ToolScanner
- APIScanner
1. Tool Scanner
From a recon automation perspective, command-line tools are tools that you typically install in your system using brew, apt, apt-install, or similar methods, and then run scans.
$ nuclei -u https://www.example.org -json -o nuclei.json -exclude-severity info -v
E.g. Amass, Subfinder, naabu, nuclei etc.
Functions to implement
To integrate a tool like nuclei, your new scanner class will needs to inherit the ToolScanner.
The functions you will need to implement as part of the ToolScanner are:
get_commands() - create the final tool command that needs to be run.
parse_report() - parse the report produced by the command, match it to the db schema and create a dictionary
db_operations() - insert the dictionary from parse_report() into the database
2. API based Scanner
Scanners that involve sending an HTTP request instead of running an OS command to perform a scan.
GET https://api.shodan.io/shodan/ports?key={YOUR_API_KEY}
E.g. Shodan, SSLMate etc.
Functions to implement
get_api_calls() - create the HTTP request you need to send
parse_reponse() - parse the HTTP response to get asset or findings information
db_operations() - insert the dictionary from parse_reponse() into the database
⏭️ We are now aware of the folder structure and Base Scanner classes, let us now look at a few utils function that will help us ease through new integrations.
Important Utils Function
Mantis stores the scan results in a MongoDB database. Therefore, when integrating a new scanner, you will also need to query/push data to/from MongoDB.
To make this process easier, we have developed utility functions that interact with the database, keeping your new scanner integration simple..
The tool_utils.py under mantis/utils consists of functions that will help you fetch information required for your new scanner as well help you push the data into mongoDB.
Read Data
Get Basic Assets Data
When you are integrating a new scanner, in the context of recon automation, your will need to pass one of the inputs to your new scanner:
- Top Level Domains (TLDs)
- IPs
- Sub Domains
Location: mantis/utils/tool_utils
Function Name: async def get_assets_grouped_by_type(args, asset_type)
Get TLDs: self.assets = await get_assets_grouped_by_type(args, "TLD")
Get Subdomains: self.assets = await get_assets_grouped_by_type(args, "subdomains")
Get IPs: self.assets = await get_assets_grouped_by_type(args, "ip")
Thats it, its that simple !!
Insert Data
Again, when you are integrating a new scanner, once the scan is complete, you will need insert the results into mongodb database
Location: mantis/utils/crud_utils
Insert Assets: async def insert_assets(assets: list, source='external')
Update Assets: async def update_asset(asset: str, org: str, tool_output_dict: dict):
Insert Findings: async def insert_findings(obj, asset: str, findings: list):
⏭️ Now that we are aware about utility functions that will make data insertion and extration simpler. Let's now take a quick look at the database Models for Assets and Findings.
DB Models
One more thing you need to understand before integrating your new scanner is the database models. Mantis's mongoDB database consists of two collections (or tables).
- Assets (Types: TLDs, IPs, Subdomains, Certificates)
- Findngs (Types: Vulnerability, Misconfiguration, Secrets, Phishing Domain)
Assets:
    _id: str = Field(..., alias="_id")
    asset: str = Field(...)
    asset_type: str = Field(...)
    org: str = Field(...)
    app: str = Field(None)
    source: Literal['internal', 'external'] = Field(None)
    created_timestamp: str = Field(None)
    cdn_names: Optional[str] = list()
    waf: Optional[str] = list()
    ports: Optional[list] = list()
    as_number: Optional[str] = Field(None)
    as_name: Optional[str] = Field(None)
    as_country: Optional[str] = Field(None)
    as_range: Optional[list] = list()
    dns: Optional[dict] = Field(None)
    ipinfo: Optional[dict] = dict()
    technologies: Optional[list] = list()
    webserver: Optional[list] = list()
    updated_timestamp: Optional[str] = Field(None)
    active_hosts: Optional[list] = list()
    stale: Optional[bool] = False
    repositories: Optional[str] = Field(None)
    others: Optional[dict] = dict()
Findings:
    _id: str = Field(...)
    host: str = Field(...)
    url: Optional[str] = Field(None)
    title: str = Field(...)
    org: str = Field(...)
    app: str = Field(None)
    type: Literal['vulnerability', 'misconfiguration', 'secret', 'phishing'] = Field(None)
    description: str = Field(None)
    severity: str = Field(None)
    tool_source: str = Field(None)
    created_timestamp: str = Field(None)
    updated_timestamp: Optional[str] = Field(None)
    host_with_protocol: Optional[str] = Field(None)
    remediation: Optional[str] = Field(None)
    info: Optional[dict] = Field(None)
    cve_id: Optional[str] = Field(None)
    cwe_id: Optional[str] = Field(None)
    others: Optional[dict] = Field(None)
    falsepositive: bool = Field(None)
    status: str = "Open"
    modified_by: str = Field(None)
🔗 New Scanner Integrations
To integrate a new scanner with Mantis, it should fall under one of these categories:
Command Line based Scanner
From a recon automation perspective, command-line tools are tools that you typically install in your system using brew, apt, apt-install, or similar methods, and then run scans.
E.g. Amass, Subfinder, naabu, nuclei etc.
$ nuclei -u https://www.example.org -json -o nuclei.json -exclude-severity info -v
API based Scanner
Scanners that involve sending an HTTP request instead of running an OS command to perform a scan.
E.g. Shodan, SSLMate etc.
GET https://api.shodan.io/shodan/ports?key={YOUR_API_KEY}
Now that you are aware of the scanner types that Mantis supports, let's get started
Command Line Tool
This tutorial will guide you through the process of integrating a new command-line tool with Mantis.
Each section builds upon the previous one, but the tutorial is structured to separate topics, so that you can easily find the information you need to address your specific needs
It's also designed to serve as a future reference, enabling you to come back and find the information you need when you need it.
✍️ Let's Get Started
Let's say that you're a bug bounty hunter or a product security engineer who thinks that a particular tool can make a specific module more efficient.
For the purpose of this tutorial, let's assume that we need to strengthen the Discovery module, which identifies subdomains, by adding a new tool. Amass.
Amass performs network mapping of attack surfaces and external asset discovery using open source information gathering and active reconnaissance techniques
📇 Files to be changed
For integrating a command line scanner, these are the files you need to make changes:
- Add a new class file under the respective module
- Add the tool name in config.yml
- Add the installation instructions in DockerFile
⏭️ Let's now integrate Amass tool into the Discovery module
Add a new tool scanner class
As a first step to integrate a new scanner, answer the below questions:
- Which module will this scanner be a part of?
- Amass is used for subdomain discovery and hence will be part of the disovery module
- Is this scanner a command line tool or API?
- Amass is a command line tool
- What will the tool output?
- Amass will output a list of subdomains
- What is the report output format we are expecting to parse?
- Though Amass supports a number of output formats, lets go with .txt
- What is the command that you need to execute?
- amass enum -passive -d {input_domain} -o {output_file_path}
- What is the input that the tool takes, meaning, TLDs, subdomains, IPs etc.?
- Amass takes TLDs as an input
Now that we have a clear understanding of the expected input and output from the tool, let's begin the process of creating the scanner class. As previously indicated here, we are required to implement three functions:
- base_get_commands() or get_commands()
- parse_report()
- db_operations()
Creating the Tool Class
Please Note - The name of the tool class should be the same as defined in the config file
Create a new file under /mantis/mantis/modules/discovery/ and name it Amass.py
Implementing get_commands()
This function needs to return a list of tool commands for every asset.
def get_commands(self, assets):
    self.org = args.org
    self.base_command = 'amass enum -passive -d {input_domain} -o {output_file_path}'
    self.outfile_extension = ".txt"
    self.assets = await get_assets_grouped_by_type(args, ASSET_TYPE_TLD)
    return super().base_get_commands(self.assets)
- self.base_command represents the command to be executed
- self.outfile_extension indicates the output file extension
- self.assets exclusively extract TLDs from the database, which are then supplied as input to Amass
Info💡- As mentioned here, Mantis incorporates a range of pre-existing utility functions to facilitate the seamless integration of new tools
Implementing parse_report()
This function is required to parse what the scanner outputs and insert it into the database. In this context, a list of subdomains need to be extrated and inserted into the database.
Info💡- To understand the DB schema, click here
def parse_report(self, outfile):
        output_dict_list = []
        amass_output = open(outfile).readlines()
        for domain in amass_output:
            domain_dict = {}
            domain_dict['asset'] = domain.rstrip('\n')
            domain_dict['asset_type'] = ASSET_TYPE_SUBDOMAIN
            domain_dict['org'] = self.org
            output_dict_list.append(domain_dict)

        return output_dict_list
You dont have to worry about where the output file is stored etc. The outfile parameter is the path to the output file generated by the tool
- domain contains the subdomain
- asset_type is a parameter required for Mantis, the type of Asset, if its a TLD, subdomain or IP
- org is the organisation to which the asset belongs to, fetched from args
Implementing db_operations()
The final step is to insert the data into mongoDB
async def db_operations(self, tool_output_dict, asset=None):
        await CrudUtils.insert_assets(tool_output_dict)
This is straight forward, call the corresponding util function to insert the data into mongoDB.
Info💡- Depending on whether you are inserting an asset, or updating an asset for recon information, or adding a new finding, you can use the corresponding util functions as described here
⏭️ In a similar fashion let's try to add a new API scanner.
Add a new API scanner class
Let's now try adding an API scanner instead of a command line tool, for example, SSLMate to Discovery module.
As a first step to integrate a new scanner, answer the below questions:
- Which module will this scanner be a part of?
- SSLMate is used to retreive all the certificates belonging to an organisation, hence this will be under Discovery module
- Is this scanner a command line tool or API?
- SSLMate is an API based scanner
- What will the tool output?
- SSLMate will list all certificates, their DNS Names, public key, SHA. The certificate has to be added to assets and the corresponding recon information has to be update
- What is the report output format we are expecting to parse?
- JSON Response
- What is the input that the tool takes, meaning, TLDs, subdomains, IPs etc.?
- SSLMate takes TLDs as an input
Now that we have a clear understanding of the expected input and output from the tool, let's begin the process of creating the scanner class. As previously indicated here, we are required to implement three functions:
- get_api_calls()
- parse_response()
- db_operations()
Creating the API Class
Please Note - The name of the tool class should be the same as defined in the config file
Create a new file under /mantis/mantis/modules/discovery/ and name it SSLMate.py
Implementing get_api_calls()
This function needs to return the tool object and the HTTP method.
async def get_api_calls(self, args: ArgsModel):
        self.asset_api_list = []
        self.scannerName = type(self).__name__
        self.endpoint = "https://api.certspotter.com/v1/issuances?domain={domain_name}&include_subdomains=true&expand=dns_names&expand=issuer&expand=revocation&expand=problem_reporting&expand=cert_der"
        self.body = ""
        self.org = args.org
        self.assets.extend(await get_assets_grouped_by_type(args, ASSET_TYPE_TLD))
        for every_asset in self.assets:
            endpoint = self.endpoint.format(domain_name=every_asset)
            self.asset_api_list.append((self, endpoint, None,  every_asset))
        return [(self, "GET")]
- self.endpoint is the full HTTP request to the API Scanner
- self.body is the HTTP request body
- self.org is the organisation passed in the arguments
- The for loop generats an HTTP request per TLD
Implementing parse_response()
This function is required to parse what the API outputs and insert it into the database. In this context, a list of certificates and its contextual information is extrated and inserted into the database.
def parse_response(self, response):
        output_dict_list = []
        response_json = response.json()
        for every_cert in response_json:
            cert_dict = {}
            cert_dict['asset'] = every_cert['id']
            cert_dict['asset_type'] = ASSET_TYPE_CERT
            cert_dict['org'] = self.org
            cert_dict['others'] = {}
            cert_dict['others']['dns_names'] = every_cert['dns_names']
            cert_dict['others']['tbs_sha256'] = every_cert['tbs_sha256']
            cert_dict['others']['cert_sha256'] = every_cert['cert_sha256']
            cert_dict['others']['pubkey_sha256'] = every_cert['pubkey_sha256']
            cert_dict['others']['issuer'] = every_cert['issuer']
            cert_dict['others']['not_before'] = every_cert['not_before']
            cert_dict['others']['not_after'] = every_cert['not_after']
            cert_dict['others']['revoked'] = every_cert['revoked']
            cert_dict['others']['revocation'] = every_cert['revocation']
            cert_dict['others']['cert_der'] = every_cert['cert_der']

            output_dict_list.append(cert_dict)

        return output_dict_list
You dont have to worry about where the HTTP response is retrieved etc. The response parameter contains the HTTP Reponse
Extract the necessary information you want to store in the mongoDB, plus the org context and the type of Asset
Implementing db_operations()
The final step is to insert the data into mongoDB
    async def db_operations(self, output_dict, asset=None):
        await CrudUtils.insert_assets(output_dict)
This is straight forward, call the corresponding util function to insert the data into mongoDB.
Info💡- Depending on whether you are inserting an asset, or updating an asset for recon information, or adding a new finding, you can use the corresponding util functions as described here
Let's now look at adding the new scanner to the config file.
Add scanner to config file
Now that the Amass.py and SSLMate.py tool classes are ready, adding it to config is simple. Add the class names Amass, SSLMate under moduleName discovery under tools
- workflowName: 'default'
    schedule: 'daily between 00:00 and 04:00'
    cmd: ['python3 launch.py -o org_name -f org-stale.txt --ignore_stale --stale']
    workflowConfig:
      - moduleName : discovery
        tools: ['Subfinder', 'SSLMate', 'Amass']
        order: 1
      - moduleName: prerecon
        tools: ['FindCDN', 'Naabu', 'IPinfo']
        order: 2
      - moduleName: activehostscan
        tools: ['HTTPX_Tech', 'HTTPX']
        order: 3
      - moduleName: activerecon
        tools: ['Wafw00f']
        order: 4
      - moduleName: scan
        tools: [ 'DNSTwister', 'Csper', 'Nuclei', 'NucleiRecon']
        order: 5
      - moduleName: secretscanner
        tools: ['SecretScanner']
        order: 6
Install instructions
Docker File
Add the install instructions below the WORKDIR /home/mantis
RUN echo "Installing Amass"
RUN wget https://github.com/owasp-amass/amass/releases/download/v3.23.2/amass_Linux_amd64.zip
RUN unzip amass_Linux_amd64.zip
RUN mv amass_Linux_amd64/amass /usr/bin
DevBox
Devbox creates isolated and reproducible development environments capable of running anywhere. It also features a package manager, NixOS. Please verify whether the package of the newly integrated tool is present here.
If the package is present in NixOs, then add the package name with relevant version to the package list under setup/ubuntu/devbox.json or setup/mac/devbox.json
 "packages": [
    "python@3.10",
    "stdenv.cc.cc.lib",
    "amass@3.22.2",
    "subfinder@2.6.0",
    "httpx@1.3.3",
    "ipinfo@2.10.1",
    "naabu@2.1.6",
    "nuclei@2.9.7",
    "gitleaks@8.17.0",
    "gau@2.1.2",
    "python310Packages.pip",
    "gccStdenv"
  ],
Else add the native installation in the setup list in setup/ubuntu/devbox.json or setup/mac/devbox.json
Testing new changes
This section covers testing new changes locally.
Building containers locally
By default, Mantis Docker setup pulls Mantis container from Github Container Registry. To test the changes you made locally, you need to build the mantis docker container locally.
To achieve this, in your setup/docker/docker-compose.yml uncomment the following lines and comment the "image" directive.
#build:
#  dockerfile: Dockerfile
#  context: ../../
Final mantis container block would look like,
mantis:
  build:
    dockerfile: Dockerfile
    context: ../../
#image: ghcr.io/phonepe/mantis:latest
... snipped ...
Now your mantis container is built locally and you can test your changes.